Modular desktop 3D printers give teams a practical way to prototype parts, fixtures, enclosures, models, and product ideas without committing to a fixed machine setup forever. Instead of treating the printer as a closed appliance, a modular system lets you adapt hardware, materials, workflows, and accessories as your prototyping needs change. This guide explains how modular 3D printers work, why they matter for rapid prototyping, and what to consider before building or upgrading a desktop 3D printing setup.
What makes a desktop 3D printer modular?
A modular desktop 3D printer is designed so key components can be added, removed, replaced, or upgraded without rebuilding the entire machine. The goal is flexibility: a user can start with a capable base printer, then expand its performance or functionality as projects become more demanding.
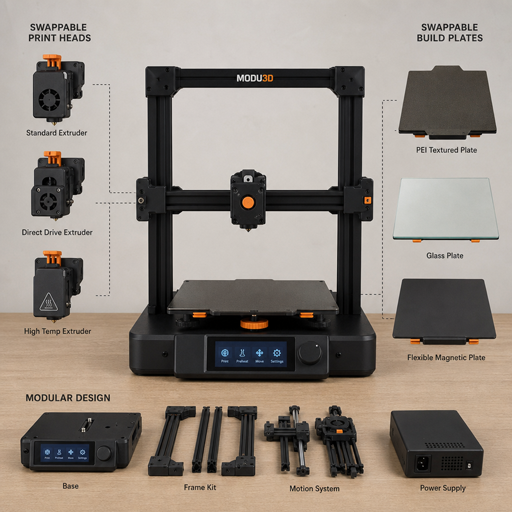
In practical terms, modularity may show up in the print head, build surface, motion system, enclosure, material handling, firmware, sensor package, or software workflow. Some machines are highly modular by design, while others support 3D printer upgrades through aftermarket parts and open ecosystems. For rapid prototyping, the value is not just customization for its own sake. It is the ability to match the printer to the job instead of forcing every prototype through the same limitations.
Common modular elements include:
- Toolheads: Swappable nozzles, extruders, laser modules, or specialty heads for different tasks.
- Build plates: Flexible, textured, smooth, or high-temperature surfaces for different materials.
- Enclosures: Add-on or removable panels that help control temperature and reduce drafts.
- Filament systems: Spool holders, dry boxes, multi-material feeders, or runout sensors.
- Cooling and airflow: Adjustable fans and ducts that improve quality for certain materials.
- Firmware and controls: Updateable settings, profiles, and calibration tools.
- Frame and motion components: Rails, belts, lead screws, or stabilizers that affect consistency.
Why modularity matters for rapid prototyping
Rapid prototyping rewards speed, iteration, and learning. A modular printer supports that process because it can evolve alongside the prototype rather than becoming obsolete when requirements shift.
For example, an early concept model may only need fast printing in a basic material. A later version may need a smoother surface, stronger filament, tighter tolerances, or better thermal stability. With modular desktop 3D printers, a designer, engineer, educator, or maker can upgrade the machine in stages instead of replacing the entire setup each time the work becomes more complex.
Modularity also reduces friction in experimentation. If a nozzle size is slowing down large concept models, a larger nozzle can help speed up rough prints. If fine details matter, a smaller nozzle and refined profile may be more useful. If warping becomes a problem, an enclosure and better bed surface may solve the issue before the project needs a more expensive production method.
Core benefits of modular desktop 3D printers
The strongest advantage of modular 3D printers is control. Users can decide which improvements matter most instead of paying for features they may not need right away. This is especially useful in product development environments where one week may require cosmetic models and the next may require functional brackets, jigs, or fit-check parts.
Another benefit is repairability. When a printer is built with accessible modules, maintenance can be less intimidating. A worn build plate, clogged hotend, damaged fan, or aging extruder can often be replaced as a component. That keeps downtime lower and helps teams maintain a familiar workflow.
Modular setups can also support better learning. Because users can see how each component affects the print, they develop a stronger understanding of desktop 3D printing. This is valuable in classrooms, labs, workshops, and small businesses where the printer is both a production tool and a learning platform.
Key benefits include:
- Adaptability: Configure the printer for different materials, part sizes, and finish requirements.
- Scalable investment: Start with essential capability, then add targeted 3D printer upgrades over time.
- Longer usable life: Replace or improve components instead of retiring the whole machine.
- Workflow flexibility: Switch between rough concept prints, functional prototypes, and presentation models.
- Easier troubleshooting: Isolate problems by component, such as extrusion, bed adhesion, or cooling.
The main modules that affect prototype quality
Not every upgrade changes results equally. For rapid prototyping, the most important modules are usually the ones that influence speed, reliability, material compatibility, and dimensional consistency.
Print head and extruder
The print head is central to performance because it controls how material is melted and deposited. A direct-drive extruder may help with flexible materials, while a different hotend may support higher-temperature filaments. Swappable nozzle sizes also matter: larger nozzles can reduce print time for bulky models, while smaller nozzles can improve fine detail when geometry demands it.
Build surface and bed system
A reliable first layer saves time. Modular build plates allow users to select surfaces that match the material and remove parts more easily. Flexible plates can make part removal safer, while textured surfaces may improve adhesion or provide a specific underside finish. For teams printing many iterations, small improvements in bed reliability can have a major effect on daily productivity.
Enclosure and temperature control
Some materials are sensitive to drafts or temperature changes. An enclosure helps create a more stable printing environment, which can reduce warping and improve consistency. It can also help organize the workspace and separate the printing area from surrounding activity. For prototyping, this makes results more repeatable when moving from one version of a part to the next.
Sensors and calibration tools
Bed leveling sensors, filament runout detection, input shaping, and other calibration aids can reduce manual setup time. These tools do not replace good print preparation, but they can make a desktop 3D printing workflow more predictable. In a fast-moving project, that predictability matters as much as raw print speed.
How do you choose the right modular setup?
The right modular setup is the one that matches your current prototypes while leaving room for the next stage of work. Start by identifying the parts you print most often, the materials you expect to use, and the problems that currently slow you down.
A team making early visual models may prioritize speed, easy material loading, and surface finish. A small engineering group may care more about strength, dimensional accuracy, and reliable repeatability. A school or shared workshop may need durability, simple maintenance, and safe, understandable components. The best modular desktop 3D printers are not always the most feature-heavy; they are the ones that make your actual workflow smoother.
Use this checklist before choosing or upgrading:
- Part purpose: Are the prototypes visual, functional, mechanical, ergonomic, or educational?
- Material needs: Will you use basic filaments only, or do you need flexible, composite, or higher-temperature options?
- Build volume: Are your parts small and detailed, or large enough to require bigger capacity?
- Upgrade path: Can the printer accept future modules without complex modification?
- Maintenance access: Are nozzles, belts, fans, and plates easy to reach and replace?
- Software support: Are profiles, firmware updates, and calibration tools clear and accessible?
- Workspace limits: Do you need a quiet setup, enclosure, filtration, or compact footprint?
Smart 3D printer upgrades for prototyping workflows
Upgrades should solve a real bottleneck. It is easy to add parts because they sound useful, but modularity works best when each change has a purpose. Before buying an upgrade, note what is failing, slowing you down, or limiting your prototype quality.
If prints fail at the first layer, focus on the bed surface, leveling, and calibration before changing the hotend. If print times are too long, review layer height, nozzle size, infill, and slicing strategy before adding complex hardware. If material performance is the issue, look at enclosure options, dry storage, and extrusion capability.
Useful upgrade priorities often include:
- Flexible build plate: Improves part removal and can reduce damage to finished prototypes.
- Improved hotend or nozzle set: Expands material options and supports different speed-detail tradeoffs.
- Direct-drive extruder: Helps with flexible or difficult-to-feed filaments.
- Enclosure: Supports temperature stability for certain materials and improves workspace organization.
- Filament dry box: Protects moisture-sensitive materials and improves consistency.
- Automatic bed leveling: Reduces setup variation, especially in shared environments.
- Better part cooling: Helps overhangs, bridges, and surface quality on suitable materials.
Best practices for faster, cleaner iterations
A modular printer is only as effective as the workflow around it. Rapid prototyping depends on making decisions quickly, documenting changes, and avoiding unnecessary complexity in early versions.
Start with the simplest print that can answer the design question. If you are testing fit, you may not need full infill or a polished surface. If you are checking ergonomics, you may need scale and shape more than strength. Save slower, higher-quality settings for the stage when they are necessary.
Strong workflow habits include:
- Print small test sections before committing to long builds.
- Label prototype versions so design changes are easy to track.
- Keep material profiles organized by filament, nozzle, and build surface.
- Change one variable at a time when troubleshooting.
- Clean and inspect the printer regularly, especially after abrasive or unusual materials.
- Record successful settings for repeat parts, fixtures, and recurring prototypes.
Common mistakes to avoid
The biggest mistake is upgrading without diagnosing. A printer that needs calibration may not benefit from a new module. A slicing issue may look like a hardware problem. A weak part may need a different orientation or material rather than a different machine.
Another mistake is over-optimizing too early. Rapid prototyping is about learning, not making every draft perfect. Modular desktop 3D printers make experimentation easier, but they should support the design process rather than distract from it.
Avoid these pitfalls:
- Adding multiple upgrades at once, then not knowing which change caused a new issue.
- Choosing exotic materials before mastering basic print reliability.
- Ignoring maintenance until print quality drops.
- Using high-detail settings for rough concept models.
- Buying for maximum specifications instead of actual project needs.
Building a flexible prototyping system
Modular desktop 3D printing is most powerful when treated as a system. The printer, materials, software, workspace, maintenance habits, and upgrade path all work together. A well-planned setup can support quick concept models today and more advanced functional prototypes later.
For most users, the best approach is to begin with a reliable foundation, learn its limits, and add targeted modules as the work demands. That keeps spending focused, reduces frustration, and gives every upgrade a clear purpose. Whether you are refining a product idea, teaching design, building workshop tools, or testing functional parts, modular 3D printers make rapid prototyping more adaptable from one iteration to the next.